How to Refinish and Reupholster a Footstool
Refinishing an old footstool is feasible even if you’ve never done anything like it before. It will take some elbow grease and patience, but you can refinish and reupholster a footstool to get a brand new looking piece of furniture!
This post may contain affiliate links for your convenience. Read our disclosure policy.
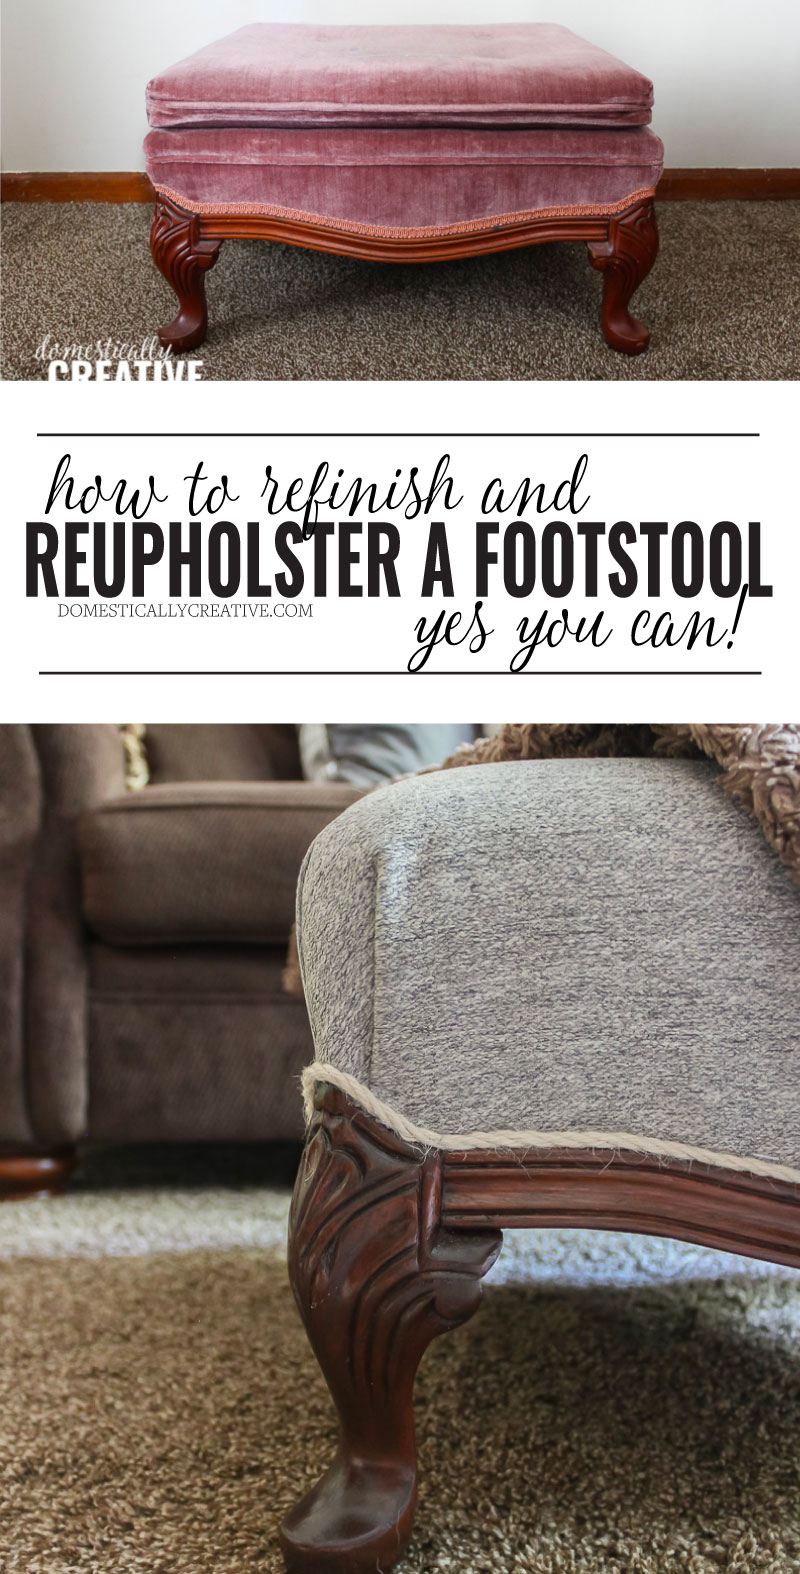
This footstool has been in my possession longer than I care to admit. I originally purchased it to go with a chair I rescued from the curb that I also still have not reupholstered. I had no idea how to refinish and reupholster a footstool let alone a chair, but thought the footstool would be a good place to start. Can you believe I scored it for only $8?! Yep! And I am so happy with the final result. Now I just need to get up the courage to dismantle the chair!

The Rules:
- Upcycle an item(s) from a thrift store, resale store, or garage sale into a new piece of decor.
- There’s no monthly theme.
- There’s no budget to stick to.
Meet the Hosts
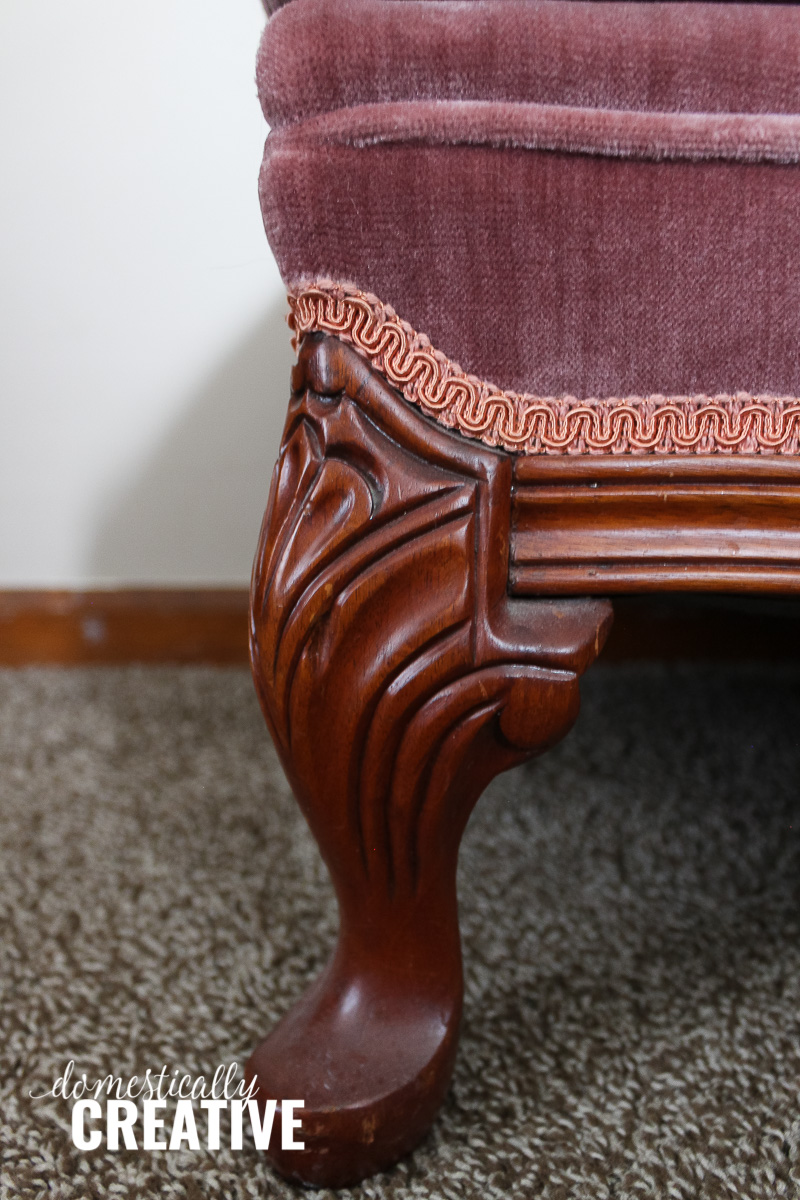
I started on this footstool adventure before last month’s thrift store challenge, stupidly thinking it wouldn’t take me that long. Boy was I wrong! Believe it or not, the thing that took the longest was not getting the existing finish off of the legs, but rather getting out the 10 trillion staples that were in it from the original pink velvet upholstery. There were many colorful words thrown around during that process. At least now I know what I can expect when I tackle the chair!
If you follow me on Instagram you may have seen some of my stories showing a little bit of the process. I wanted to do some videos of the whole thing, but once I got in the groove I just kept going. Hopefully the process photos and tutorial will be helpful though!
How to Refinish and Reupholster a Footstool
Items you’ll need:
This list looks daunting, but I promise that if I can do this project so can you! This was my first time working with paint stripper and gel stain and I think the final results turned out great!
- Ugly Footstool (thrift store score for $8)
- Upholstery Fabric
- Foam or upholstery batting
- Trim or cording to compliment fabric
- Staple remover
- Staple gun and staples
- Finish stripper (if restaining)
- Stiff Putty Knife
- Wire brush
- Sander/Dremel
- Sand Paper
- Gel Stain
- Foam brushes
- Rag
- Polyurethane
- #0000 Steel Wool
- Tack Cloth
- Glue Gun/Glue Sticks
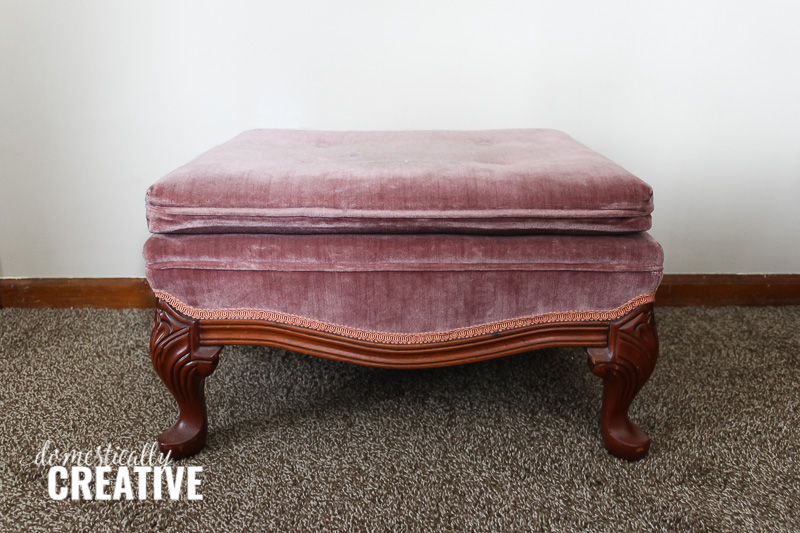
The original foot stool was upholstered in a way that it looked like it had a separate but attached cushion on top. I think that’s what made it so hard to dismantle! Believe it or not the original cushion was in great shape so I decided to save it for when it was time to reupholster.
The thing that saved my sanity when I was trying to remove the millions of staples this footstool had on it is this handy staple remover. Seriously, without it I would probably still be working. That’s not true, I would have thrown the whole thing out the window from frustration.
 There were even more staples under this layer and more under the above cording!!
Refinishing
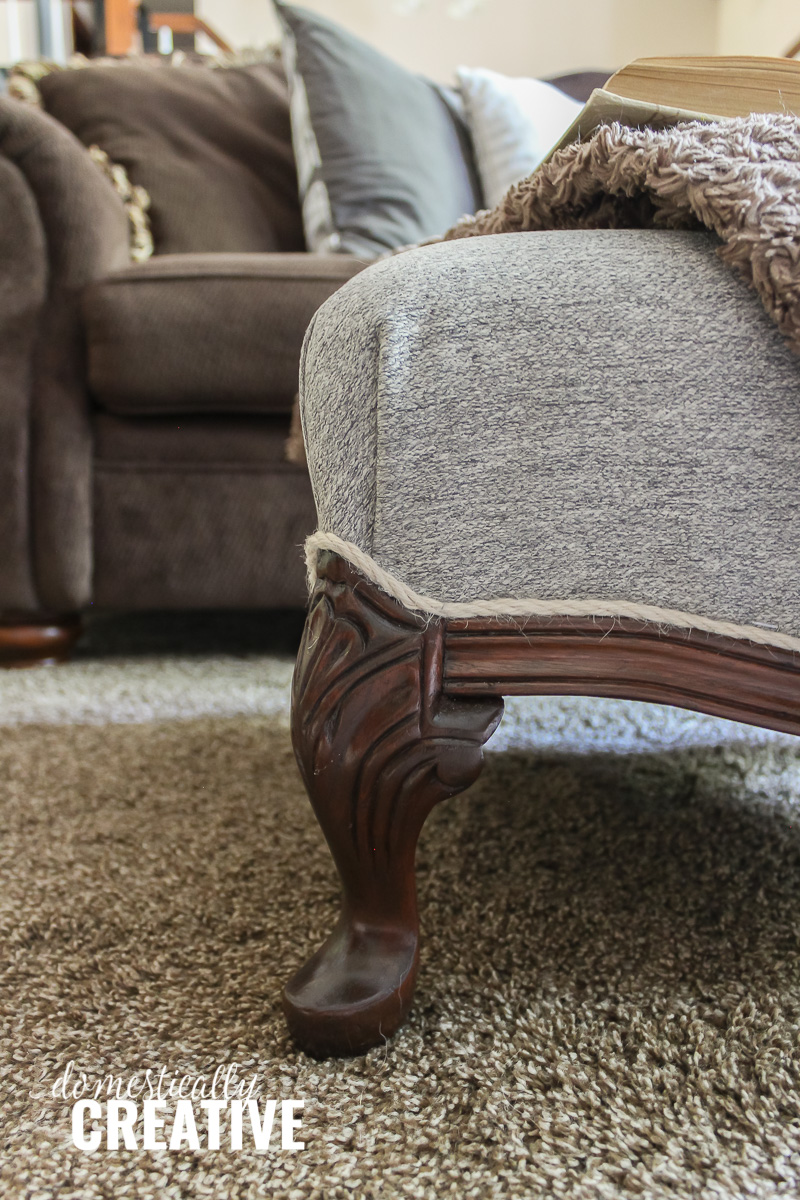
The next step was removing the existing finish. I definitely could have gone the easy route and painted the wood, but it’s solid wood and I really do not want to paint the wood on the chair. So to make the finishes match, the too red finish on the footstool had to go even though it was in pretty good shape.
I’ve never used a paint or finish stripper so this was a new experience for me. I used this stripper that was crazy easy to brush on. It doesn’t have much of a smell to it, but I did use it outside to be safe. I slapped it on really thick and let it dry for about an hour. The instructions read that once it turned white (or pale green) it was ready to go.
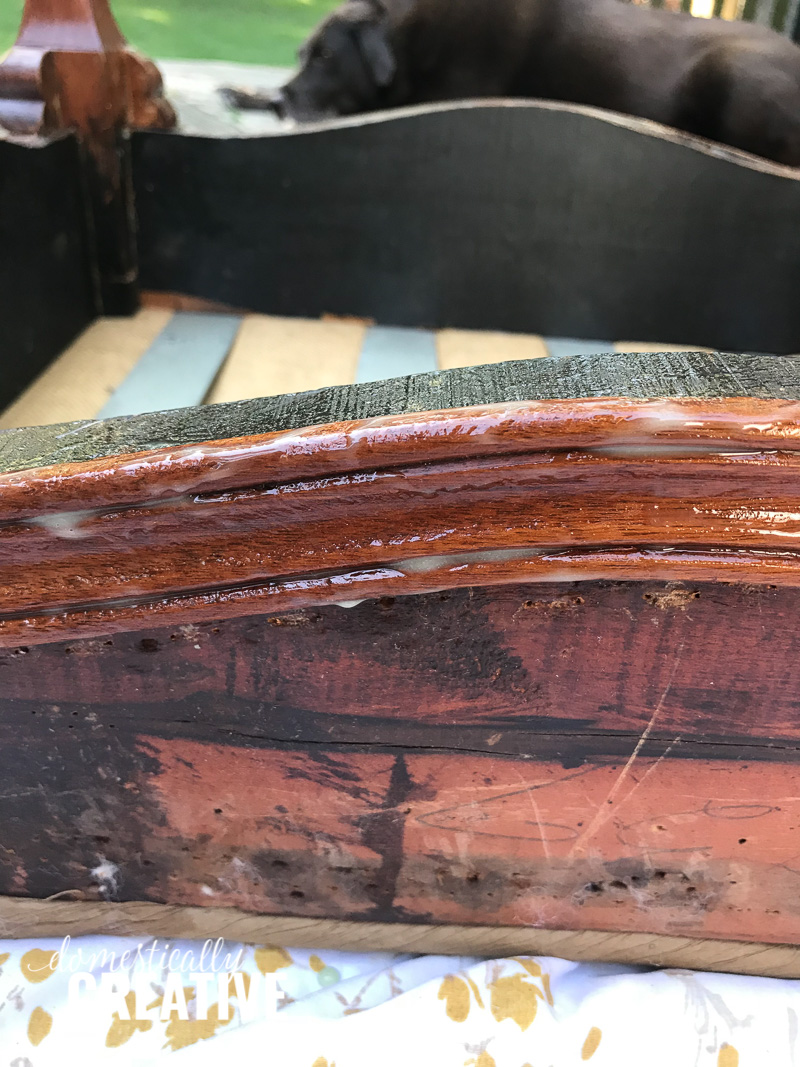
To scrape the finish off, I used a cheap putty knife you can grab in the paint department at any hardware store. Make sure you get a stiff one though and not a flexible one. I used the scraper on all of the large surfaces, then took a wire brush to the intricate parts. This actually went pretty quickly, taking the better part of a morning between putting on the stripper and actually stripping the finish. I was pleasantly surprised thinking it would take so much longer.
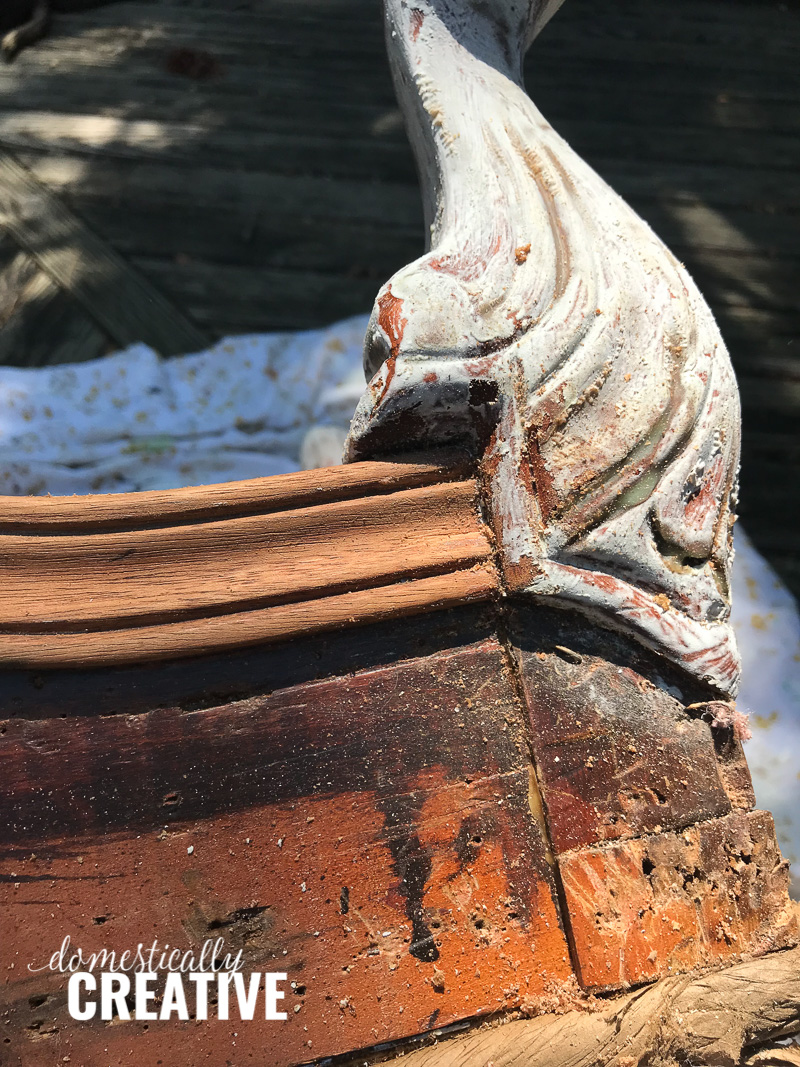
The next part was sanding. I wasn’t able to get every last piece of finish off in some of the more intricate places so sanding was a must! I used my Dremel micro and a sanding drum to do most of it. I used the finest grit I could find for this. To really smooth it down after wards and to get into the intricate details, I used a sheet of 3m flexible sand paper in the finest grit. Tip: wrap the tip of a flat head screwdriver or a flat tool with sand paper to gently sand in the ornate pieces.
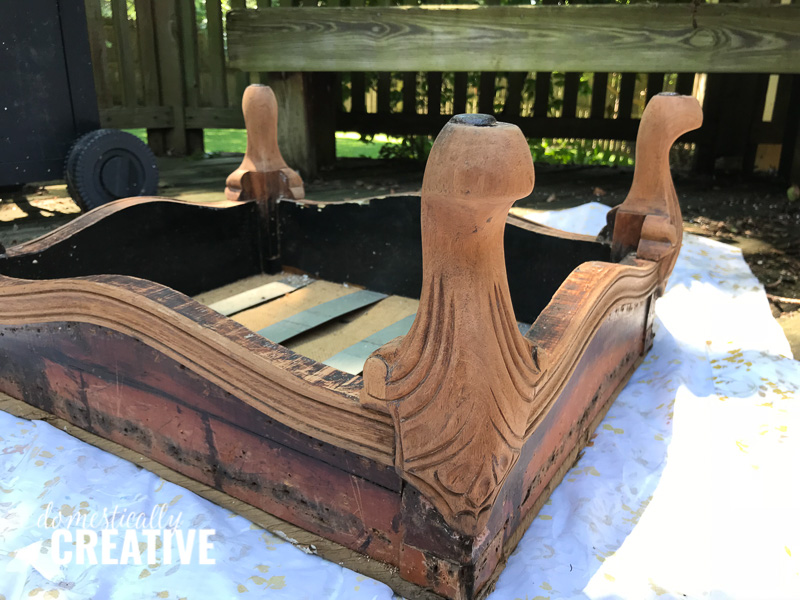
Once everything was sanded as smoothly as possible, cleaned and all of the dust wiped away, I applied a coat of Minwax Gel Stain in Walnut. This stain will be the closest to the existing stain on the chair! One thing I learned with gel stain is that it starts drying pretty quickly so if you don’t wipe the excess off fast it will get gummy. I ended up going over it twice because there were a few places it looked streaky because of it drying so quickly. Make sure you sand lightly between coats with a fine steel wool and wipe down with tack cloth.
When the stain was completely dry, I gave it one coat of polyurethane to protect the finish. I used a semi gloss, but a satin finish would look great too!
Reupholstering
The reupholstering was fairly easy to do, but this isn’t my first time upholstering something. Check out this bench and king size headboard. I reused the original cushion but added some extra padding to give it more lift.
This footstool needed a little over 1 yard of fabric, so I cut 1.5 yards to make sure I had plenty to work with. I also got extra to use on the chair next. The first thing I did was add a staple in the center of both long sides, making sure to pull the fabric taught. This way it doesn’t stretch or skew to one side. While I was stapling, I was constantly smoothing the fabric out to make sure there were no wrinkles or loose areas. You do want the fabric to be pretty taught, but without pulling the padding down to make it look lumpy. Staple as close to the trim as your stapler will allow.
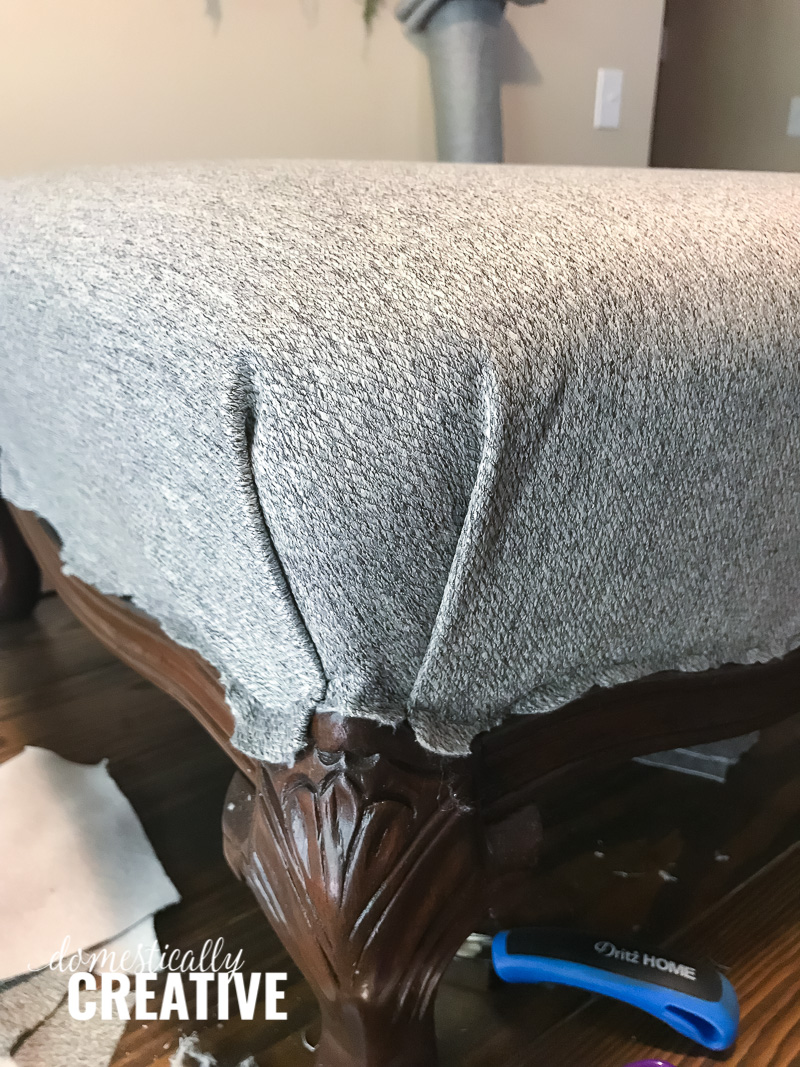
Since the legs on this footstool have a decorative portion that “overlaps” the upholstery, the corners were a bit tricky. Here’s how I made them look nice. On either side of the decorative leg, I smoothed down the corner of the fabric to look flat and placed a staple on each side. See the picture for a better visual.
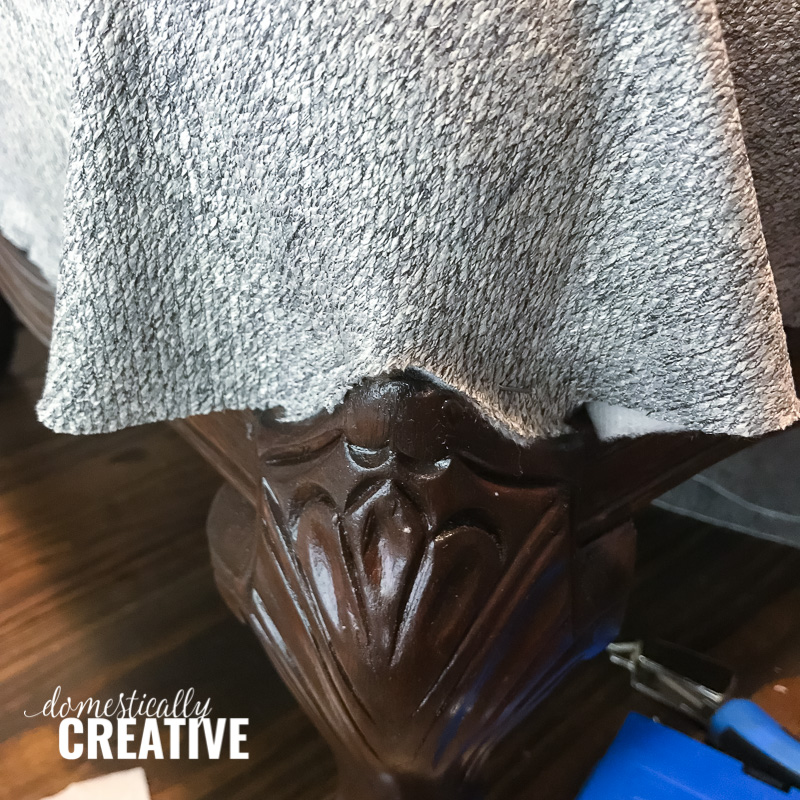
Then with the excess fabric on the sides, I made two symmetrical pleats. I stapled those into place. If you have difficult corners to do too it may be helpful to cut off excess fabric before trying to smooth them down or the corners may look bulky.
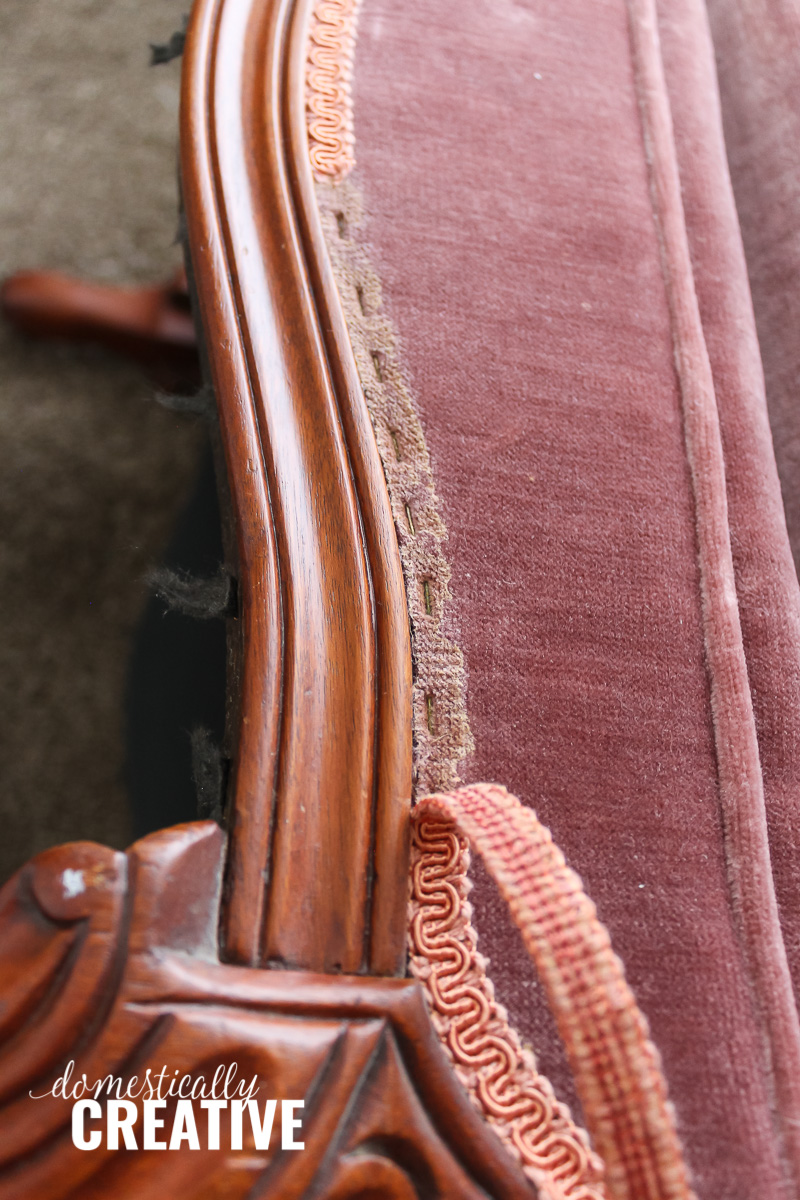
Once the fabric was stapled all into place, I took a small pair of fabric scissors and in some places an x-acto knife, to cut the excess fabric off. I wanted to leave as little hanging past the staples as possible before putting the trim on.
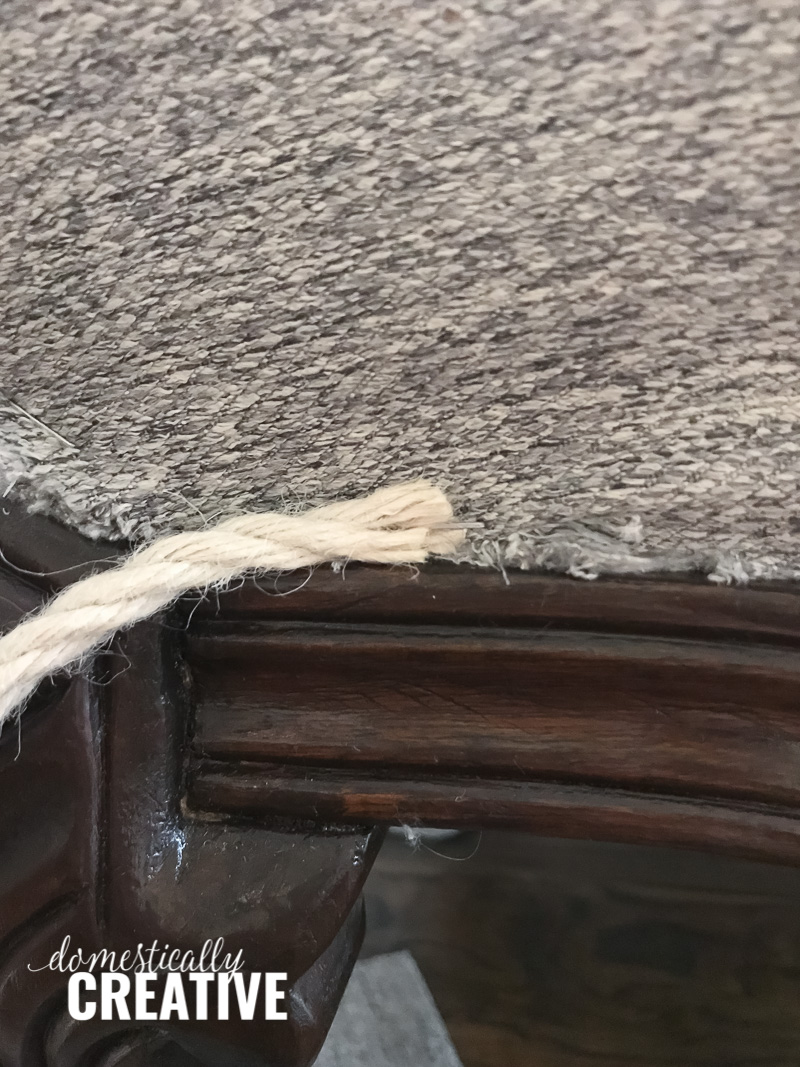
For the finishing touch, I used a linen colored cording to trim around the fabric and wood. I really wanted to use a flat piece of decorative trim, but could not find one to match my fabric! I searched everywhere and finally settled on this linen cording. I’m still deciding how I feel about it, but it should be easy to remove should I change my mind.
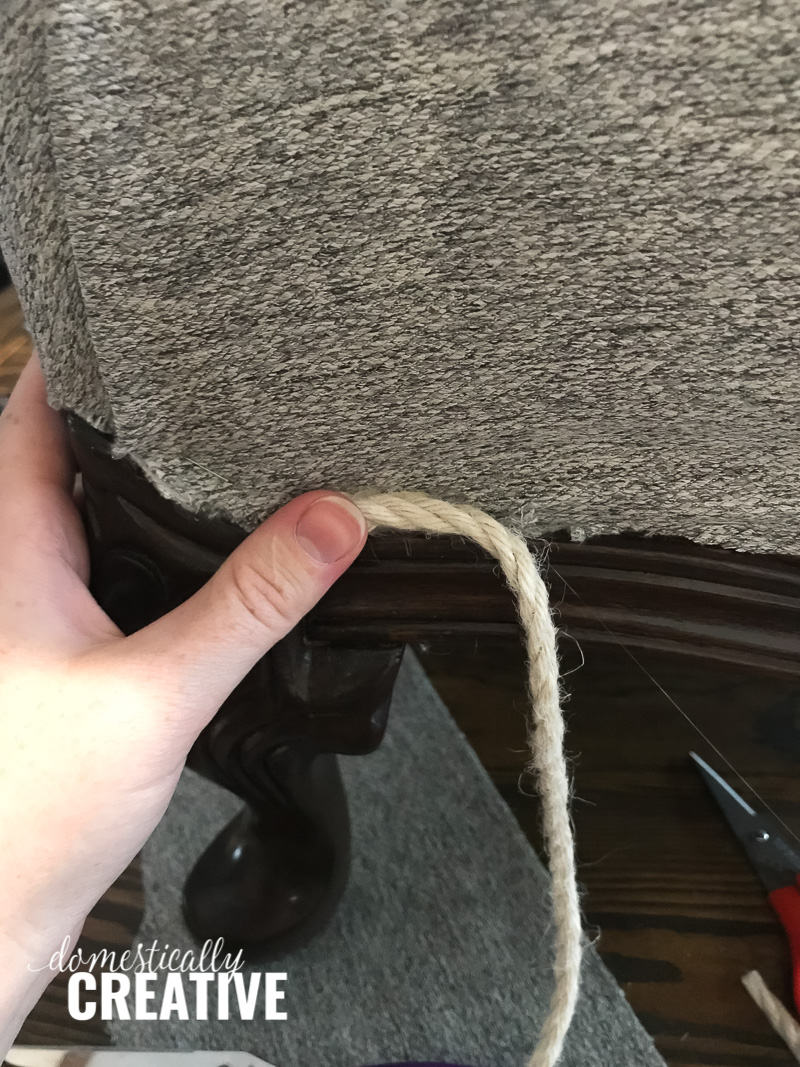
Since the end of the trim frays easily, I stapled the end just off to the side of one of the corners.
Then I flipped the trim over (to cover the staple I just placed) and used a drop of hot glue to keep secure it. Working in small sections, I pressed the cording down into the hot glue firmly along the edge of the wood. This finishes off any uneven edges in your fabric and hides those staples!
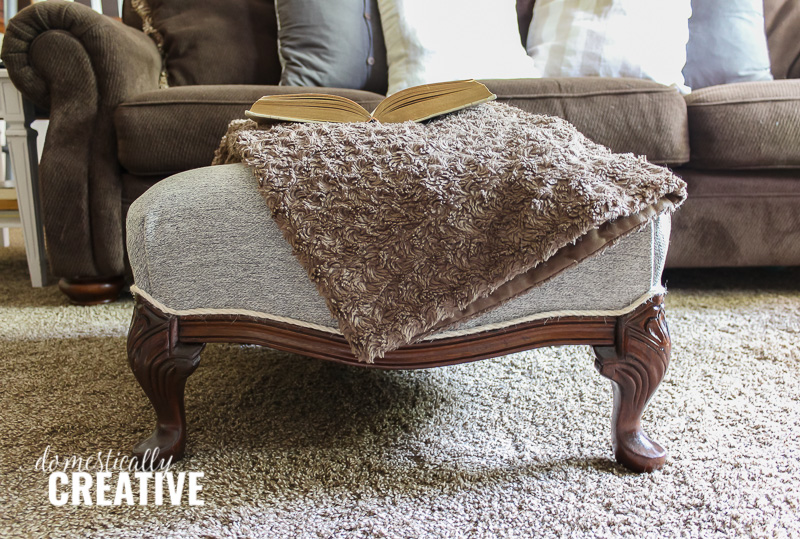
The refinished and reupholstered footstool looks SO much better than the original right? I can’t wait until I’m finished with the chair, although getting the courage to get started is so hard! For now though, I’m going to sit back and put my feet up and admire my newest thrift store upcycle!

Love this? Pin it for later!
Don’t forget to check out the rest of the talented ladies’ creations too! And let me know in the comments if you’ve ever reupholstered anything. If you’ve done a chair send me all of your wisdom and secrets because I am a little bit nervous for that one!
Check out what my fellow upcyclers created below!
The footstool looks fantastic. The fabric is very nice and the cording is a great detail.
This turned out great Amanda!! I really love that fabric too. I did a chair once and it was easier than I anticipated. Seeing how well you did on this I know the chair will look beautiful when you are done, can’t wait to see it!
I love your footstool transformation, Amanda! You did a fabulous job! I think by eliminating the top cushion gives it a very chic, updated look!
This looks great Amanda. It was a labor of love. I like the linen cord around it. We used stripper on the kitchen cabinets and it worked so well. Pinning!